
Free fertiliser? Coming right up!
 This is more of a long term project for you mamas, but the sooner you get started, the better. because you can make huge savings to your fertiliser costs if you invest the time now. You simply can never have too much compost or other home made fertiliser.
We have two big compost bins and two worm farms busily churning away, and we have plans to expand this. Get this right, and you can pretty much fertilise your entire garden for free. That’s pretty darned frugal!
First things first. If you are throwing vegetable scraps away, that needs to stop. That’s good plant or animal food you are wasting!
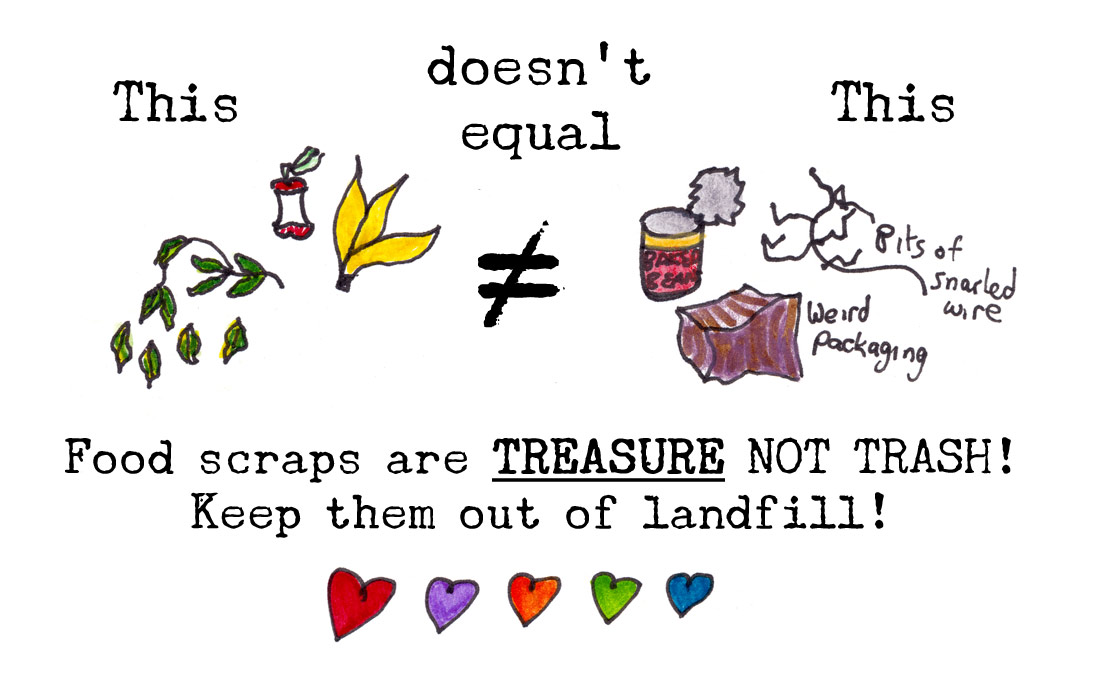
Food scraps in landfill create toxic gas instead of feeding plants.
 Before your food scraps even reach the chook yard or compost bin, you should be able to make a stock out of some of them, as I have described in a previous blog. Food scraps thrown in landfill are actually harmful to our environment.
Deprived of oxygen, they produce a gas called methane which contributes to climate change, packing a punch that is 20 times more potent than CO2.
This is downright depressing, but so easy to fix, and what’s more, it will mean more food for you. What have you got to lose?
Obviously, if you live in an apartment or college, composting might not be practical, but there are ways around that. There are some wonderful worm farms on the market that are compact and they don’t make a big mess or smell bad, I promise. All you need is a shaded spot. I have written more about worm farms below.
Some community gardens have big compost bays where you can take your scraps, or maybe you or someone you know has chickens. Who knows? Someone might be willing to swap you some scraps for eggs!
First things first, though. Composting. There’s a bit of a knack to it, but anyone can do it, I promise. Read on.
How to make a cranking compost.
 Getting a good compost mix going will transform your garden and it is obviously very frugal.
When we first began composting, we had no real idea of what we were doing. Like many people, we just thought it was a matter of chucking food scraps into the compost bin and waiting.
Do this, and chances are you will get a smelly, maggot-ridden mess that doesn’t nourish your soil. Making a really good compost is all about finding a good recipe. Luckily, that recipe is pretty forgiving.
A quick little lesson:
There are two types of plant materials that you should add to your compost; those high in carbon and those in nitrogen.
Brown ingredients are brown and dry, like dead leaves, dry grasses and small twigs they are rich in carbon, which regulates how quickly compost breaks down and prevents it from rotting too quickly.
Green ingredients add nitrogen, which helps everything break down. Without green ingredients, the compost might take years to form.
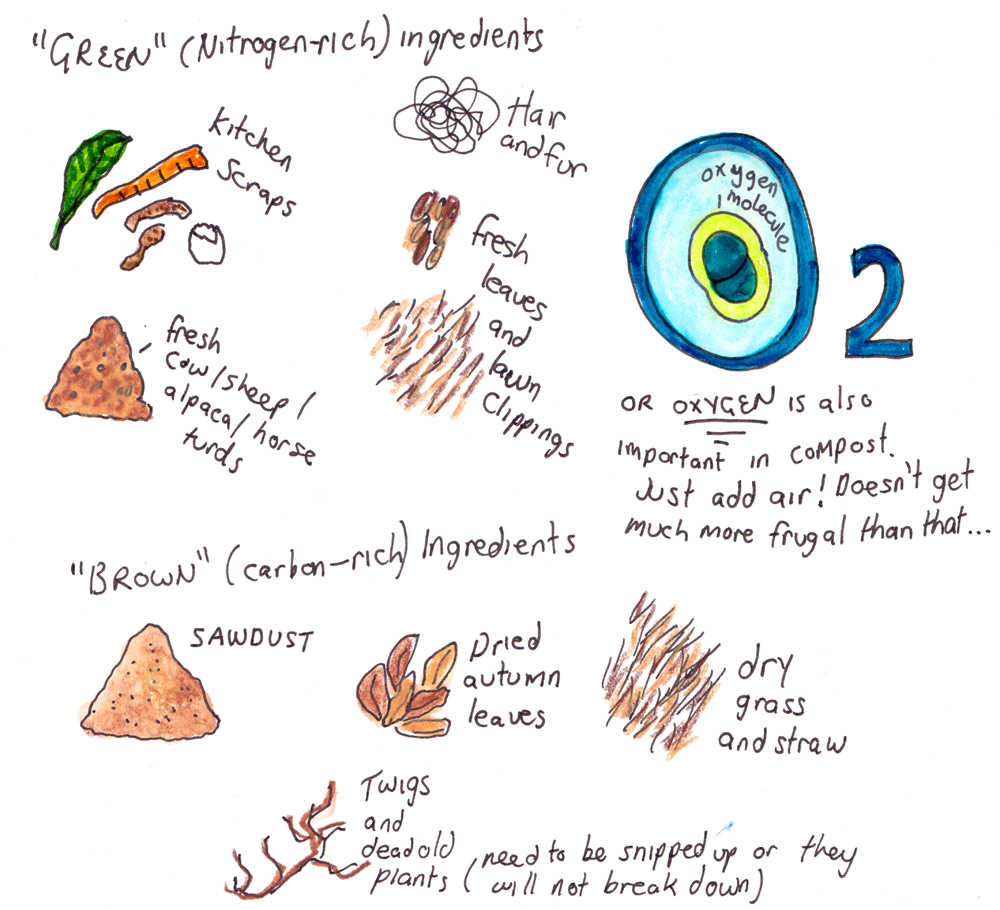 They include kitchen scraps, cowpats, leaves, veggies dug from the garden and weeds. There is a very simple way to tell a green ingredient: it rots quickly. If it rots or disintegrates and possibly stinks to high heaven after a few days, then you can confidently pronounce it ‘green’.
Although experts don’t agree on exact figures, in ideal circumstances, compost should be a balanced mix of these. Too much nitrogen, and you get a smelly, rotting mess instead of good compost. Too much carbon and your compost will not break down fast enough.
There is a third, very important ingredient in a good compost: oxygen.
Without oxygen, the compost will either not break down (if there is a lot of carbon) or it will become smelly and disgusting (if it’s too heavy in nitrogen).
The thing you need to add here is elbow grease. You need to turn the compost over so as much of it as possible is exposed to the air. This is just getting in with a fork and moving the compost underneath to the top.
Finally, a good compost needs moisture. Compost needs to be damp to keep the organisms breaking it down happy. The ideal is moist, not wet. Every week when you turn your compost, it’s worth having a peek to see if it’s getting dry. Water it with a hose if need be. You can also pee on your compost. Word has it that men’s pee is best!
 There are two methods of composting people use: hot composting and cold composting.
Hot composting is done by layering large quantities of compost in a set pattern, turning frequently and adding water. You need a lot of “carbon” ingredients. It is high maintenance and really only works if you have a large amount of compost to work with – typically, a minimum of one cubic metre is ideal. That can be a big ask in the average household. Hot composting is done in large bays or big tumblers.
Unlike cold composting, hot composting kills weed seeds and pathogens so you can chuck weeds and diseased plants in. It is also much quicker than cold composting. Gardening Australia offers a more detailed rundown for anyone interested.
We use cold composting because we don’t produce huge amounts of waste and because it’s the laziest form. The other nice part is worms really like it. Our compost bin is full of worms, who help us get our compost quicker. We do use some of the principles of hot composting; layering, turning frequently and trying to maintain a good ratio of ingredients, but some people don’t even do that.
You can get away with throwing things in willy-nilly, but you might need to do a bit of troubleshooting every now and then if your compost is smelly or not breaking down.
 Also, living in a sub-tropical climate, it doesn’t seem to take too long for compost to form no matter what we do. We have two compost bins going – one we bought and one we salvaged from someone who wanted to compost and then lost interest. By having two, we can stagger our compost usage out, letting one mature while using the other one.
Buying a compost bin isn’t essential and gardening gurus like Peter Cundall have their reservations, but for us they are ideal. I recommend procuring one if you live in a city and don’t produce much waste. They keep your compost neatly tucked away and less exposed to rats.
On community gardens they are important if you want to compost your kitchen scraps. In fact, some councils will provide you with a free or low-cost compost bin if you ask. They are coming into favour because composting diverts waste from landfill.
Setting up cold compost is simple. To begin, add a layer of porous organic material (hedge clippings, autumn leaves, the “carbon” type). This will help your compost drain well so that it will be moist but not soggy.
Then, you add your other ingredients, whatever you have available. Ideally, you want to add it in layers, starting with sticks, then lawn clippings, then kitchen scraps. This is great in theory, but in practice, many home gardeners produce haphazard amounts of waste. It’s not the end of the world if you don’t do it by the rule book.
We have a comfrey plant near our compost bin.
Comfrey is a great helper for home composters and is known as a plant superfood because of its ability to draw nutrients from the soil into its leaves.
Whenever we add kitchen scraps, we add a layer of comfrey leaves over the top.
We live in a horsey area, so we also head out every once in a while and grab a bag of horse manure and throw that in. If you know a local farmer you can pick up cheap manure, or if you’re lucky (and a bit plucky) they might let you go out and shovel yourself a bag for free.
A few troubleshooting ideas for if you’re having problems
Smelly compost
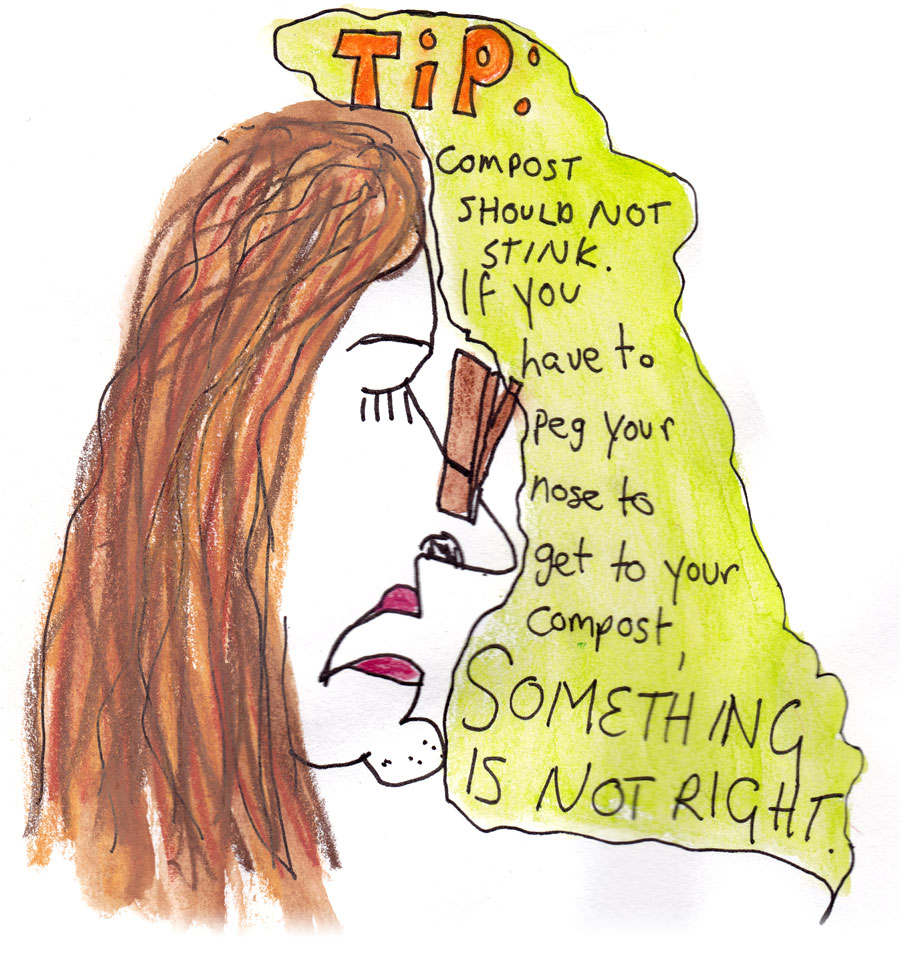 This is probably a result of too many nitrogen-rich ingredients. Everything is rotting quickly instead of gently composting. Some suggestions:
- Cut back on the watering for a bit and let it dry out.
- Add a generous quantity of brown things and mix thoroughly.
- Turn your compost frequently to get the air circulating through it.
- Put a bin of sawdust near your compost and sprinkle some over every time you add some kitchen scraps. Make sure you use sawdust from untreated timber…
- Adding lime can work wonders. Frugal Frank once tipped a disgusting bokashi compost mix into our bin. I don’t know what went wrong that week, but it stunk out the entire neighbourhood! It was Christmas time and our poor neighbours were trying to enjoy a spell in the back yard. We sprinkled a good handful of lime over and voila! Smell gone, instantly. I was well impressed!
Vermin and pests
- Enclose your compost – this is why I love my compost bin enough to ignore my idol Peter Cundall. If yours is hollow at the bottom, sit it on a bit of chicken wire.
- Mask food smells by adding plenty of grass clippings
- Don’t put animal products in the compost.
Compost isn’t breaking down
- Add more things that rot – poo, food scraps and so on.
- Turn the compost. Nothing like a bit of fresh air sometimes!
- If you live in a cold climate, covering the compost with a sheet of dark plastic might help.
How do I know when my compost is ready?
Your compost is ready when it looks like moist, dark soil. There should be no recognisable chunks in it. It should smell sweet. In compost bins, the finished compost tends to filter its way to the bottom. There should be a little trapdoor that you can open and fish what you need out with a trowel.
Worm farms: fertiliser powerhouses
 We got our first worm farm about a year ago now, and I can’t sing its praises highly enough. Worms are the lowest maintenance pets ever. I’m serious, mamas. You don’t even need to feed them every day. I don’t.
Best part? They make free, high-quality compost for your garden that increase your food yields, so indirectly, THEY feed YOU. Not many pets’ll do that.
They are machines, too. They are mind-bogglingly efficient at turning food scraps into plant food.
Not just any plant food, either.
Worms make some of the best food your plants could ever want, and you can also use their pee as a liquid fertiliser.
A little goes a LONG way… it is best to dilute it with 1 part worm pee to 20 parts of water, or it will burn the plants. Our worm farm makes enough liquid fertiliser to make a continuous and generous supply for our veggie patch and potted garden.
This makes them an excellent choice for home gardeners.
You can buy worms and a worm farm kit, or you can take some worms from a friend and make your own little farm very cheaply.
We bought a kit but now I’ve gotten into worm farming, we’ve extended our farm with a simple home made one. I believe we might even make more, depending on how far that one stretches.
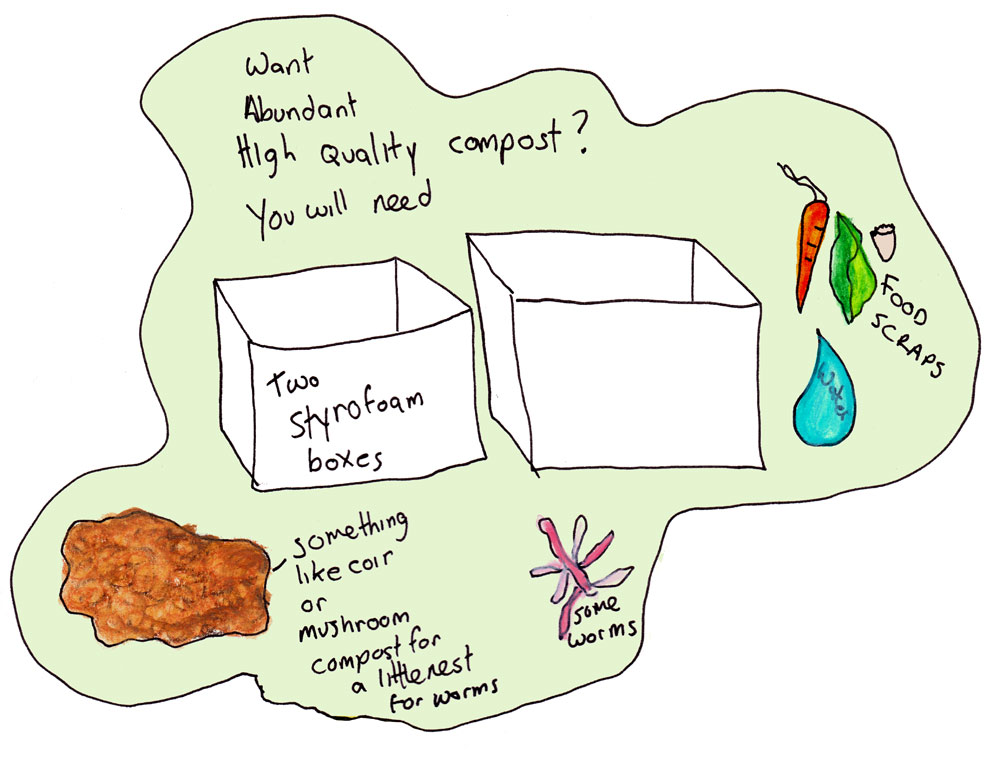
Home made worm farms cost peanuts to set up and give you free fertiliser.
You can even use their pee. You will need two styrofoam boxes – these are often available at nurseries. You will also need some old carpet or some kind of decent cover for the worm farms. I found this great four minute video to show you how it’s done and get you inspired.
So there you have it: a few ideas to feed your soil with things that many people would throw in the rubbish. Get this stuff set up now, mamas, and your garden will get better and better every year.
I’ve set you up pretty well, I think. Next, I will look at planting.